House Update #34: DIY Custom Window Trim
Hi Friends, I haven’t shared a house update post for a while, I’m sorry!
In today’s post, I’m going to share with you the story of a window. I know, that sounds super boring, but I promise you, it’s worth the read!
A few things before I get started… 1. In every photo, I’m showing the same window throughout the entire process. 2. This is my son’s bedroom (it’s still hard for me to look at these photos 3. If you ever have an insurance related claim or natural disaster, take photos of the entire process because you never know when you’ll need them.
Before The Fire
This is what the window and room looked like when we bought the house. Three months after moving halfway across the country to this home, our lives would be turned upside down when the house (this room in particular) was struck by lightning.
This post may contain affiliate links, which means I’ll receive a commission if you purchase through my link, at no extra cost to you. Please read full disclosure here.
p.s. before moving in, we had this carpet ripped out and installed hardwood floors to match the rest of the entire house.

During The Fire
This room is actually my son’s bedroom. He was sleeping in this room when the roof above it was struck by lightning and caught fire. While the fire was in the attic, it spread to his bedroom. *Insert mommy dearest breaking Usain Bolt’s record time running to get my son. It still makes my stomach hurt when I look at these photos.
See more in Update #1: House Fire, Struck by Lightning

All of the contents of his bedroom were shoveled out of this window by the firefighters. Even his bed.
See more in Update #2: Update

During Demo
During the demo of the house, a shoot was constructed from this window to the dumpster to dispose of all of our walls, ceilings, and more.
See more about the demo in Update #4: The Beginning of Demo & A Few Hidden Surprises
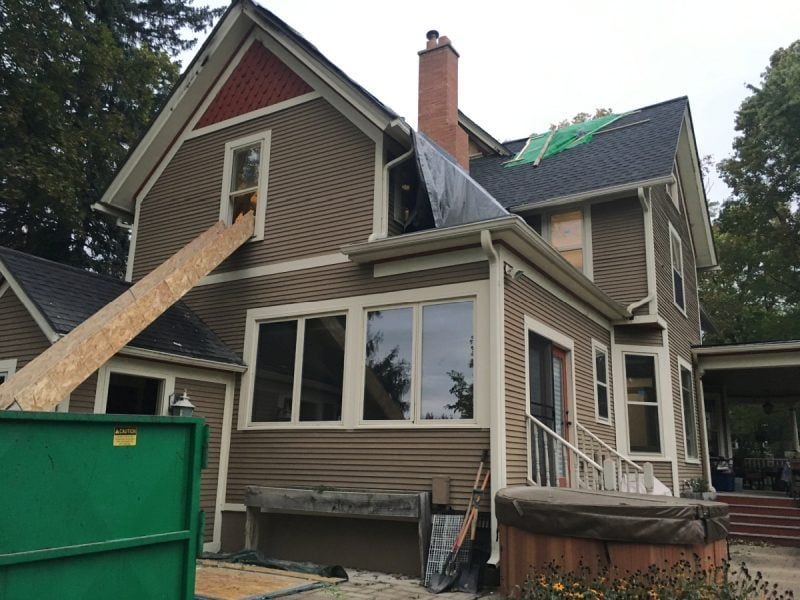
Removal of the Roof
Then the roof had to come off. You can really see how charred the wood was. However, as we were told by the firefighters, our house still stands today because it was so old. It was 133 years old when it withstood this fire and protected my son. They said that if this was a new construction house, it would have collapsed within minutes.
I’ll put it this way, I love this house. It’s been a hell of a ride, but, through God’s amazing grace and the amazing builders of yesteryear, my son walked (well, ran, lol) out of this room without a hair on his body being hurt. No matter the crap we have had to deal with, I will always, always, always be thankful.
See more about the roof removal in Update #10: Roof Update #11: Roof Demo Update #12: Roof Demo & Rebuild

Rebuilding
After the demo, it was time to rebuild the framing. We opted to get rid of the attic above his bedroom and vault his ceilings. A genius decision we made!! We also refused to let the house be built back with trusses. We wanted it stick framed, just like it had been built.
See more about our rebuild in Update #13: Beginning of Rebuild

The cross bars (that run horizontal) were temporary. We had the ceiling vaulted all of the way up! The extra height makes his room feel so much bigger!
My little cutie designing his space!

Insulation
Blown-in insulation was used to insulate all of the exterior walls that were exposed like this.
See more about this in Update #23: Insulation

Plaster Walls
My husband and I chose to have our house built back with plaster walls instead of regular drywall. Plaster is so much more durable, more fire resistant, more quiet…and time-period friendly. Every decision we have made in the rebuild has been with 1886 at the forefront.
See more about this insanely messy process in Update #24: Plaster Walls

After a series of events, our home was “gifted” back to us at this last photo. Insert the song by Garth Brooks, “sometimes I thank God, for unanswered prayers”…if life wasn’t crazy enough, our home was still not livable. But, as the saying goes, “when the shit hits the fan”, you can either sink or swim. We were in pure survival mode and had to move forward.
Rather than go into all of the projects we completed to make the house actually pass inspection to live in it, you can check out all of my house fire updates. I’m way behind on sharing a huge majority of the projects from the “gifted” back point, but, there’s still enough reading material for an entire day! haha!
Some of my favorites are Update #14: Secret Bookcase! Update #25: Surprise Visitors Update #27: Laundry Room Makeover
Moving Forward
Yesterday, I sent a photo of the woodwork I was doing in my son’s room (and to every single doorway, closet and window on our 2nd story) to my friend, Kim from Exquisitely Unremarkable and she really made me feel so great. While I think nothing of me framing out windows with custom woodwork, she points out the fact that it is pretty amazing that I’m doing this myself! (She’s the best kind of friend to have…a true lifter-upper!) I then realized that I needed to share this update! HA!
Window Sills
For some reason, during the demo process of the house, the workers cut our sills making them flush with the wall (🤷♀️) so, my husband had to use a hacksaw to cut off the nails and pry out the 135 year old remaining pieces of window sill…and then build new window sills!
Because our house is so old, it was built with true lumber sizes (ie: a 2×4 actually is 2″x4″ verses what it is today at 1 1/2″x3 1/2″. So, we can’t just go buy a regular piece of lumber, cut it and stick it in. We had to purchase a 5/4×4 x8 select pine board to build our window sills to ensure that it was thick enough!
My husband used (my, lol) jig saw and a hand sander to custom build the window sills to perfectly fit in the spaces.

Custom Window Trim
Next up, it was my turn! Time to make the windows (and doors) beautiful!! I truly had no building plans when I designed these toppers. I had only seen a photo of a beautiful door casing and knew I had to recreate it when we built back our home.

I’ve completely finished our entire upstairs which includes all of doors, closets and windows! And guess what, I’m so proud that I DID IT!!! Now my craftsmanship can grace this house for the next 135 years…and I’ll proudly know that a girl did it! 🙂
You can watch my time lapse video I created of me making and installing the custom window trim. I’ll be sure to share a full DIY tutorial post soon about how I made these so you can replicate them if you desire!

Do It Yourself and Save Money!
Our house was actually supposed to be put back together after the fire, but it was “gifted” back to us unfinished. We had another contractor come out and give us a quote for doing all of our trim and the quote we were given was outrageous (and this was before the insane boom in prices!) For just the upstairs, they told us it would be $13k in labor and at least another $7k+ in supplies. They quoted each window taking 4 hours (AND this did not include making the toppers beautiful like I did…what?!?!?)
I’m here to tell you, that this ol’ stay-at-home mom built these beautiful custom toppers in 20 minutes and for about $30 each! You guys…it was not hard at all. Like literally! It’s one of the most simple DIY projects I’ve ever done!
It completely blew my mind what we were quoted! My point in sharing this with you…is not to dog the building community, but to show you that you CAN have a beautiful, custom home, built by YOU!! It just takes a little effort and desire!…and maybe a little swift kick in the rump 🤪😂
You’ve got this, friends!!
Fire Updates:
Update #1: House Fire, Struck by Lightning
Update #2: Update
Update #3: Frustration
Update #4: The Beginning of Demo & A Few Hidden Surprises
Update #5: Demo of the Downstairs
Update #6:
Update #7: Silver Spoon
Update #8: Trick-Or-Treat; Victorian Style
Update #9: New Joists
Update #10: Roof
Update #11: Roof Demo
Update #12: Roof Demo & Rebuild
Update #13: Beginning of Rebuild
Update #14: Secret Bookcase!
Update #15: We Have Roof Shingles!
Update #16: Heart Hunters & Easter
Update #17: Butler’s Door
Update #18: Hometalk Segment & Video Walk-Through
Update #19: Beginning of Electrical, Plumbing and HVAC
Update #20: Garden & Bunnies
Update #21: Choosing An Exterior House Color
Update #22: Treasures Hidden In The Ceiling
Update #23: Insulation
Update #24: Plaster Walls
Update #25: Surprise Visitors
Update #26: Half Bathroom Before & After During Fire Demo
Update #27: Laundry Room Makeover
Update #28: How To Paint & Refinish HVAC Vent Grate Covers
Update #29: DIY Wooden Door Plaque
Update #30: Spring Porch Decor
Update #31: Garage Door Makeover | How To Install Carriage Door Hardware
Update #32: Our Victorian Farmhouse Kitchen | Progress Update
Update #33: House Updates
Update #34: DIY Custom Window Trim


Stephanie—home cook, DIY addict, seasonal decor fanatic, and proud chicken wrangler living in a Victorian house that’s always a project. Whether I’m cooking with garden-fresh ingredients, herding mischievous chickens, or tackling another DIY, I’m here to share the fun (and chaos).


First of all, you are a master craftsperson. I’m so impressed with your skills, that window frame looks like it was pulled right out of This Old House. It’s a total pro job. You go girl! And second, thank you for the very kind words. Right back at you, my friend!! <3
Thanks Kim!! ❤️ Well, that’s the best compliment ever! Maybe one day (when my house is clean) I’ll be able to take more photos and share them…and who knows, maybe even share them with This Old House…hahahha! Who am I kidding, this house will never be clean enough!! lol
I’m so sorry you went through a fire Stephanie! Thank goodness no one was hurt. Like Kim, I’m so impressed with your framing skills. To my eye, it looks better than (lots of) money could buy from the pros! How lovely that your work will be gracing the house for the next hundred + years.
Thank you so much Sara! I truly love it and I think I love it more because I did it. … and because it’s my house, I want it done correctly, so, I will toot my own horn and say that it truly does look good! You would never know I was the one who did it! 🙂