How To Update a Shiny Gold Frame with Rub ‘n Buff
I’m completely obsessed with Rub ’n Buff, a paint-like product my mom introduced me to years ago. Rub ’n Buff is a wax-based metallic finish that’s applied by hand and then buffed to create a realistic metal look on surfaces like wood, metal, and plastic. It’s one of those magical DIY products that instantly transforms almost anything with just a dab of product and a little buffing.
In this tutorial, you’ll learn how to use Rub ’n Buff to update a shiny gold picture frame and give it a softer, antique-inspired finish. I’ll walk you through the exact supplies you need, step-by-step application tips, how long Rub ’n Buff takes to dry, and how to get the perfect matte or polished look. This quick DIY project is ideal for thrifted frames and other small home décor pieces that need an easy, budget-friendly makeover.

This makeover is so simple and took just a few minutes to complete – that’s my favorite type of DIY!
Supplies You’ll Need
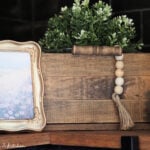
- Photo frame (mine was shiny gold)
- Rub ‘n Buff in your desired color – I used Antique Gold for this project, but Rub ‘n Buff comes in a variety of gorgeous metallic shades. You can see a full breakdown of all the Rub ‘n Buff Gold Colors or check out what all the Rub ‘n Buff colors look like before you start your own project.
- Soft cloth or paper towel

Step-by-Step Instructions
Step 1: Clean the Frame
Start by wiping down your frame with a damp cloth to remove any dust or residue. If the frame is especially dirty, you can use a gentle cleaner, but make sure it’s completely dry before applying Rub ‘n Buff.
This post may contain affiliate links, which means I’ll receive a commission if you purchase through my link, at no extra cost to you. Please read full disclosure here.

Step 2: How to Apply Rub ’n Buff to a Picture Frame
Using a paper towel: Squeeze a tiny amount of Rub ‘n Buff onto a paper towel and gently rub it onto the frame. This works great for small frames or areas with a lot of detail.

A little goes a long way, so start with a tiny amount and add more if needed.

Step 3:How to Buff Rub ’n Buff for a Matte or Shiny Finish
Once the Rub ‘n Buff is applied, let it sit for 10-15 minutes. Use a clean cloth to gently buff the surface. This step brings out the shine and helps smooth out any uneven application. You can leave it more matte if you prefer, or buff it to a high shine.

Step 4: Let It Cure
Although Rub ‘n Buff dries quickly, it’s a good idea to let your frame sit for 24 hours to fully cure before handling.
Tips for Best Results When Using Rub ’n Buff
- Start with a very small amount. Rub ’n Buff is highly concentrated, and using too much at once can make the finish look streaky or heavy.
- Build the color in light layers. Applying thin coats gives you more control and creates a softer, more realistic antique finish.
- Buff lightly for a matte look, or longer for shine. The more you buff, the shinier the finish becomes.
- Let it fully cure before handling. Even though it feels dry quickly, wait at least 24 hours so the finish doesn’t smudge or wear off.
- Focus on raised details first. Applying Rub ’n Buff to edges and details helps highlight texture and gives the frame a high-end look.
- Seal only if needed. For decorative frames, sealing usually isn’t necessary, but a clear wax or sealant can add durability if the frame will be handled often.

Step 5: Add Artwork
Once your frame is fully dry and you’re happy with the finish, carefully place your chosen artwork or photo inside the frame to complete your beautiful, custom piece.

If you love how easy this is, you can also use Rub ‘n Buff to update dresser hardware and handles for a quick furniture makeover!
Before & After
This thrifted frame is just one of the many ways you can use Rub ‘n Buff! Check out this DIY thrift store lamp makeover to see how I used the same product to transform an outdated lamp into a stunning accent piece.

Frequently Asked Questions
- How long does Rub ’n Buff take to dry? Rub ’n Buff feels dry to the touch in minutes, but it’s best to let your project cure for 24 hours before handling to ensure the finish doesn’t smudge or rub off.
- Do I need to seal Rub ’n Buff? For most decorative frames, sealing isn’t necessary. However, if the item will be handled frequently, a clear wax or sealant can add extra durability.
- Can I use Rub ’n Buff on metal or plastic frames? Yes! Rub ’n Buff works on a variety of surfaces, including wood, metal, plastic, and resin. Make sure the surface is clean and dry before applying.
- How much Rub ’n Buff should I use? A very small amount goes a long way. Start with a tiny dab and build up in light layers for the best results.
- Can I achieve both matte and shiny finishes? Buff lightly for a soft, matte look, or buff longer to create a bright, polished finish.
If you’ve got a photo frame that needs a little makeover, don’t toss it – try Rub ‘n Buff! Whether you want to warm up a brassy gold, soften a silver frame, or even add a pop of metallic color, this little tube is a game-changer.
Have you used Rub ‘n Buff before? Let me know in the comments which project you tried and what color is your favorite!

How To Update A Shiny Gold Frame with Rub ‘n Buff
Equipment
- Photo frame (mine was shiny gold)
- Rub ‘n Buff in your desired color (I used Antique Gold for this project)
- Soft cloth or paper towel
Instructions
- Step 1: Clean the Frame – Start by wiping down your frame with a damp cloth to remove any dust or residue. If the frame is especially dirty, you can use a gentle cleaner, but make sure it’s completely dry before applying Rub ‘n Buff.
- Step 2: Apply Rub ‘n Buff – Using a paper towel: Squeeze a tiny amount of Rub ‘n Buff onto a paper towel and gently rub it onto the frame. This works great for small frames or areas with a lot of detail. A little goes a long way, so start with a tiny amount and add more if needed.
- Step 3: Buff to a Shine – Once the Rub ‘n Buff is applied, let it sit for 10-15 minutes. Use a clean cloth to gently buff the surface. This step brings out the shine and helps smooth out any uneven application. You can leave it more matte if you prefer, or buff it to a high shine.
- Step 4: Let It Cure – Although Rub ‘n Buff dries quickly, it’s a good idea to let your frame sit for 24 hours to fully cure before handling.
- Step 5: Add Artwork – Once your frame is fully dry and you’re happy with the finish, carefully place your chosen artwork or photo inside the frame to complete your beautiful, custom piece.


Stephanie—home cook, DIY addict, seasonal decor fanatic, and proud chicken wrangler living in a Victorian house that’s always a project. Whether I’m cooking with garden-fresh ingredients, herding mischievous chickens, or tackling another DIY, I’m here to share the fun (and chaos).


