DIY Plywood Ghost Lawn Decorations — Easy Outdoor Halloween Project!
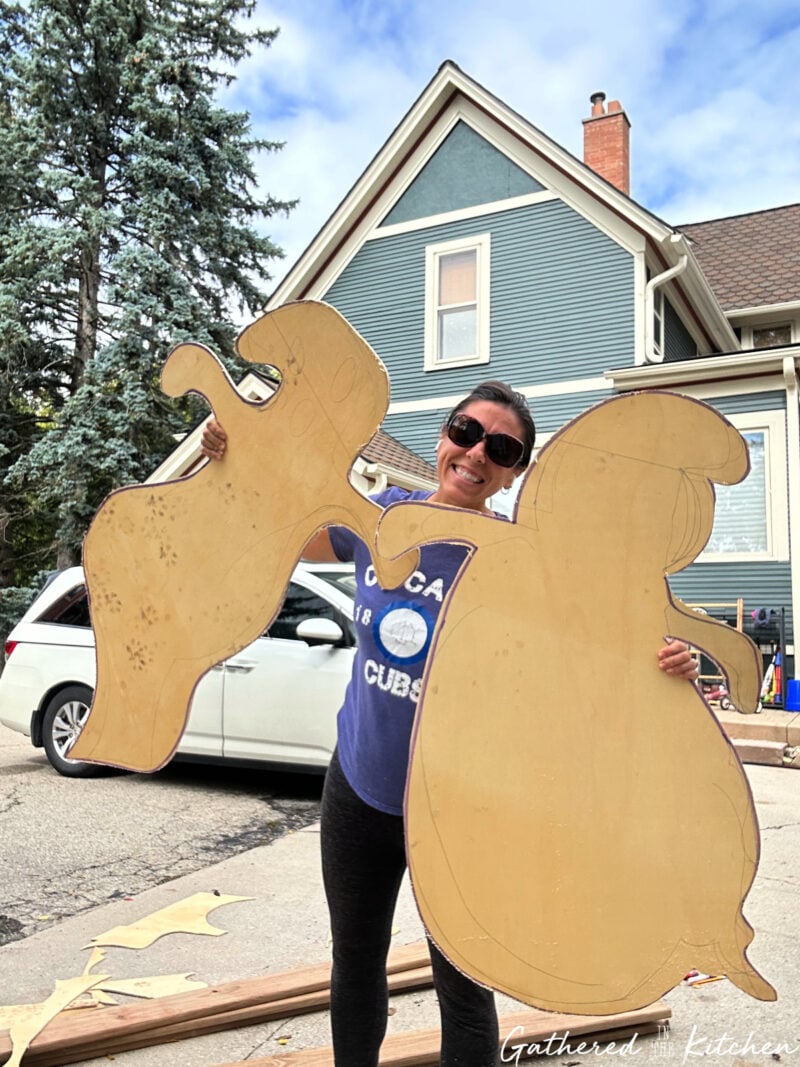
Every year I love adding a little homemade touch to our Halloween decorations — and this might be my favorite project yet! I took a simple ¼” sheet of plywood, sketched out two big friendly ghosts, and cut them out with my jigsaw.
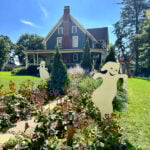
A little white paint, a few spooky details, and some metal pipes later — boom! I had the cutest DIY plywood ghost lawn decorations waving at everyone who walks by. It’s such an easy and fun outdoor Halloween craft that you can finish in a weekend (and on a budget!).

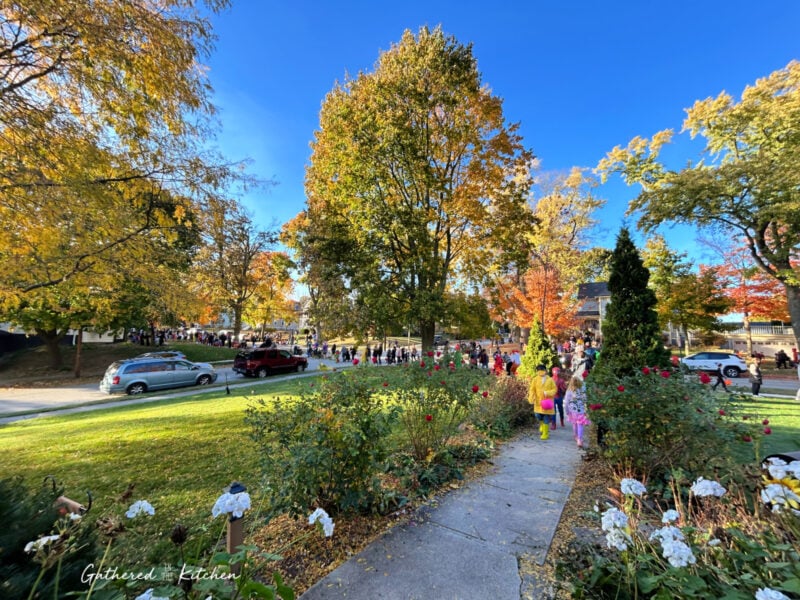
Halloween is a big deal in our town — especially on the historic street we live on. It’s lined with beautiful old homes from the late 1800s and early 1900s, shaded by towering trees that turn every shade of gold and orange come fall. Walking down our street in October feels like stepping right into a Hallmark movie!
Each year, we have nearly 1,000 trick-or-treaters stop by, and it’s become such a fun tradition to be part of. I’ll admit — one year I got a little Grinch-like about having to stay home to hand out candy to the endless stream of kids instead of going out with my own little cutie pie. But my husband gently reminded me what a gift it really is — that so many families from surrounding towns choose to come here to trick-or-treat in a safe, beautiful, historic neighborhood… with a friendly lady on the porch handing out candy. 💛
This post may contain affiliate links, which means I’ll receive a commission if you purchase through my link, at no extra cost to you. Please read full disclosure here.
How to Make DIY Plywood Ghost Lawn Decorations
I’m not a fan of anything scary, so I gave my wooden ghosts a friendly twist — think Casper the Friendly Ghost from the 1990s movie! Their cheerful faces make them perfect for a fun, family-friendly Halloween display that go great with my Halloween porch decor.
Draw Ghost Outline
Use a pencil or marker to sketch the shape of your ghosts directly onto the plywood. Keep the lines simple and flowing — think friendly, classic ghost shapes with wavy edges and rounded tops. Don’t worry about perfection — the charm of this DIY project is in its handmade look!

Cut Out Ghosts with Jigsaw
Carefully cut along the ghost outlines using a jigsaw. Take your time around the curves and corners for smooth edges.

Sand the Edges of the Ghosts
After cutting, use sandpaper or a sanding block to smooth the edges of your plywood ghosts. This step removes any rough spots or splinters and helps the paint go on evenly. Plus, it gives your ghosts a clean, finished look that’s perfect for outdoor display!

Paint The Ghost, Eyes and Seal for Outdoor Use
Paint each ghost with a few coats of white paint, then add black eyes and any fun facial details you like. Once the paint is completely dry, finish with a clear outdoor sealer to protect your ghosts from rain and weather. This step keeps them looking great all season long!

Secure Ghosts to Metal Pipes with Pipe Straps
Attach the plywood ghosts to sturdy metal pipes using pipe straps and screws. This keeps your ghosts upright and stable when anchored into the ground. It’s a simple, reliable way to make sure your outdoor Halloween decorations can handle fall winds and stay standing tall all season!


Decorate Your Yard with the Finished Ghosts
Once your ghosts are painted and attached to the metal pipes, it’s time for the fun part — setting them up in your yard! Arrange them near trees, walkways, or your porch for a spooky yet charming Halloween display. Add lights, hay bales, or pumpkins to complete the festive look!

And that’s it — your adorable DIY plywood ghosts are ready to haunt (in the friendliest way possible)! 👻 This project is such a fun and affordable way to add a little decor to your Halloween yard!
If you try making your own, I’d love to see them — tag me @GatheredInTheKitchen or share your photos in the comments below. Happy Halloween and happy crafting!
DIY Plywood Ghost Lawn Decorations
Equipment
Materials
Instructions
Draw Ghost Outline
- Use a pencil or marker to sketch the shape of your ghosts directly onto the plywood. Keep the lines simple and flowing — think friendly, classic ghost shapes with wavy edges and rounded tops. Don’t worry about perfection — the charm of this DIY project is in its handmade look!
Cut Out Ghosts with Jigsaw
- Carefully cut along the ghost outlines using a jigsaw. Take your time around the curves and corners for smooth edges
Sand the Edges of the Ghosts
- After cutting, use sandpaper or a sanding block to smooth the edges of your plywood ghosts. This step removes any rough spots or splinters and helps the paint go on evenly. Plus, it gives your ghosts a clean, finished look that’s perfect for outdoor display!
Paint The Ghost, Eyes and Seal for Outdoor Use
- Paint each ghost with a few coats of white paint, then add black eyes and any fun facial details you like. Once the paint is completely dry, finish with a clear outdoor sealer to protect your ghosts from rain and weather. This step keeps them looking great all season long!
Secure Ghosts to Metal Pipes with Pipe Straps
- Attach the plywood ghosts to sturdy metal pipes using pipe straps and screws. This keeps your ghosts upright and stable when anchored into the ground. It’s a simple, reliable way to make sure your outdoor Halloween decorations can handle fall winds and stay standing tall all season!


Stephanie—home cook, DIY addict, seasonal decor fanatic, and proud chicken wrangler living in a Victorian house that’s always a project. Whether I’m cooking with garden-fresh ingredients, herding mischievous chickens, or tackling another DIY, I’m here to share the fun (and chaos).


These were such a fun and easy project – even if you’re worried about using a saw, a jigsaw is super great for beginners!