How to Make a DIY Coffee Filter Wreath
A beautiful and easy wreath made from coffee filters for less than $5! Using a hot glue gun and coffee filters you can transform your space in less than an hour!
I absolutely love making homemade wreaths – it’s one of my favorite crafts! I enjoy creating beautiful wreaths for my front door, like my Curly Deco Mesh Wreath and DIY Buffalo Plaid Lambs Ear Wreath, but I also love decorating the inside of my home with unique handmade wreaths. Some of my favorites are my Burlap Bubble Wreath, Book Page Wreath and this gorgeous coffee filter wreath!
This coffee filter wreath was actually inspired by the abundance of white coffee filters I had lying around after we switched to using reusable K-cups with our Keurig. Instead of letting them go to waste, I turned them into a simple yet stunning wreath!
To make this wreath, all you need is a pack of regular-sized coffee filters, a foam wreath form, a hot glue gun, and several sticks of hot glue and one hour of time. It’s an easy, budget-friendly DIY that adds the perfect touch of charm to any space!
This post may contain affiliate links, which means I’ll receive a commission if you purchase through my link, at no extra cost to you. Please read full disclosure here.

Why You’ll Love This DIY Wreath
- Budget-friendly: Made with everyday materials, this coffee filter wreath costs less than $5
- Easy to make: No special crafting skills required—just a little patience and a hot glue gun!
- Customizable: Change the colors by dyeing the coffee filters or adding ribbons and embellishments
- Perfect for any decor: Whether you love farmhouse style, rustic decor, or shabby chic, this wreath fits beautifully

Supplies Needed
Gather your supplies before getting started. This simple craft requires only a few materials:
- 150 – 200 coffee filters (regular size)
- foam wreath form (any size, but a small to medium one works best)
- Hot glue gun
- 10-15 glue sticks
- Scissors (optional, for trimming)
- Floral wire (optional, for hanging)

Step-by-Step Tutorial for a DIY Coffee Filter Wreath
Step 1: Prepare Your Materials
Start by plugging in your hot glue gun and letting it heat up. While it’s warming, separate your coffee filters so they’re easy to grab as you go.

Step 2: Scrunch and Glue the Coffee Filters
Take one coffee filter and scrunch it up in the center to create a fluffy, ruffled look. Add a generous amount of hot glue to the base and press it onto the foam wreath form. Be careful—hot glue sticks can get very hot, so you might want to use the back of a pencil or a craft tool to press the filters into place.

If you prefer to avoid hot glue, use a stapler instead! Simply open it up and staple the scrunched coffee filters onto the foam wreath, as shown in the image below.

Step 3: Continue Layering
Repeat this process, gluing one coffee filter at a time onto the foam wreath form. Keep the filters close together to create a full and textured effect. Work your way around the entire wreath, making sure there are no gaps where the foam wreath form is visible. ❗️Be careful!!! I burnt myself many times doing this, ouch! I suggest using the bottom end of a pencil or something similar to help press on the filters

Step 4: Fluff and Adjust
Once you’ve covered the entire wreath, step back and check for any uneven areas. If needed, trim the coffee filters with scissors to even out the shape. You can also add extra filters to areas that need more fullness.

Step 5: Customize Your Wreath (optional)
Want to add a personal touch? Here are some ideas to customize your DIY coffee filter wreath:
- Add a ribbon: Tie a decorative ribbon around the top to hang your wreath.
- Dye the coffee filters: Use tea, Kool-Aid, or food coloring to create a farmhouse-style wreath in muted tones or a bright seasonal wreath for fall or Christmas.
- Incorporate accents: Hot glue small flowers, beads, or seasonal decorations for an added pop of charm.

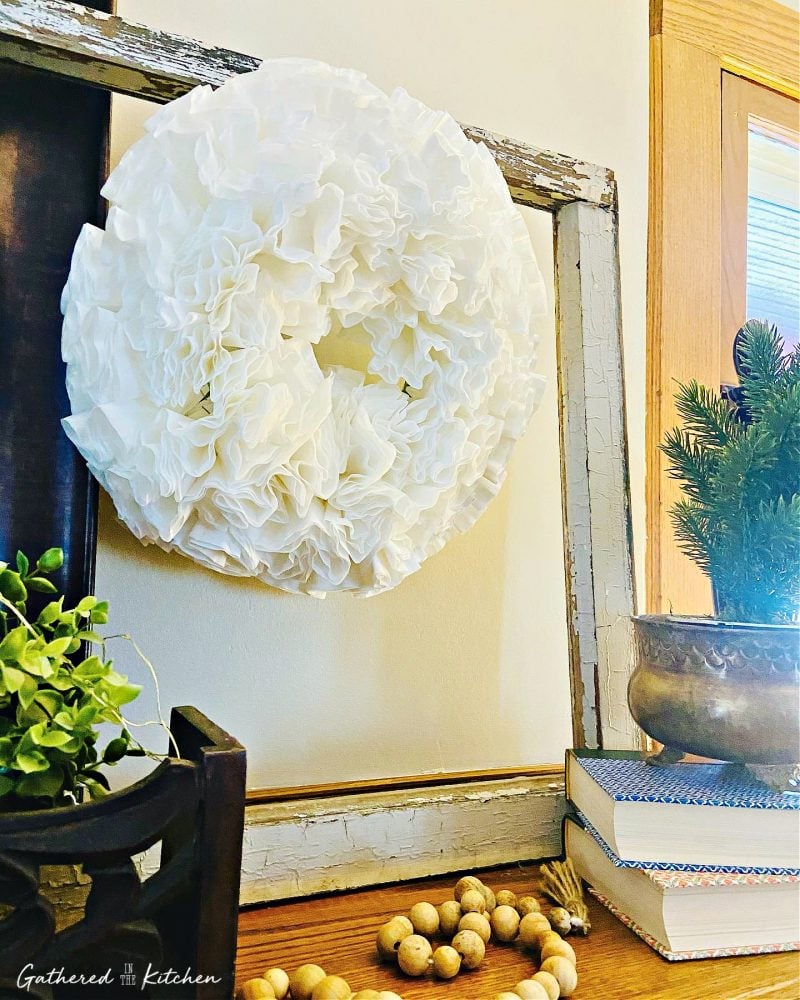
How to Display Your Handmade Wreath
Your new coffee filter wreath is lightweight and easy to hang anywhere! Here are a few ideas:
- Above a mantel for a cozy rustic wreath look
- On the door of a china cabinet hutch
- On your front door as an elegant, budget-friendly wreath alternative to store-bought options
- As wall art in a farmhouse-style kitchen or dining area
- Hung in a bedroom for a soft, romantic touch

Making a coffee filter wreath is a simple way to add warmth and personality to your home. With just a foam wreath form, coffee filters, and a hot glue gun, you can craft a DIY wreath that’s affordable, stylish, and completely customizable. Whether you keep it neutral for an elegant handmade wreath or add pops of color for a seasonal wreath, this project is sure be a fun project!
If you love making homemade wreaths as much as I do, be sure to check out my book page wreath tutorial, where I upcycled an old book into a beautiful, vintage-style wreath by rolling and gluing pages onto a foam form. And don’t miss my rag wreath tutorial – one of the easiest wreaths ever, made by simply tying fabric scraps onto a wire wreath form! No matter your style, there’s a perfect DIY wreath for every space!
Printable Instructions Card
So grab your supplies, fire up your hot glue gun, and start crafting your own DIY coffee filter wreath today! I’d love to see your versions of this DIY coffee filter wreath! Share your creations in the comments or tag me on Instagram @gatheredinthekitchen

Coffee Filter Wreath
Materials
- 1 pkg paper coffee filters white, regular sized
- 1 8-10" foam wreath form
- hot glue gun
- 10-20 hot glue sticks
- floral wire to hang the wreath
Instructions
- Step 1: Prepare Your MaterialsStart by plugging in your hot glue gun and letting it heat up. While it’s warming, separate your coffee filters so they’re easy to grab as you go.
- Step 2: Scrunch and Glue the Coffee FiltersTake one coffee filter and scrunch it up in the center to create a fluffy, ruffled look. Add a generous amount of hot glue to the base and press it onto the foam wreath form. Be careful—hot glue sticks can get very hot, so you might want to use the back of a pencil or a craft tool to press the filters into place.
- Step 3: Continue LayeringRepeat this process, gluing one coffee filter at a time onto the foam wreath form. Keep the filters close together to create a full and textured effect. Work your way around the entire wreath, making sure there are no gaps where the foam wreath form is visible. ❗️Be careful!!! I burnt myself many times doing this, ouch! I suggest using the bottom end of a pencil or something similar to help press on the filters
- Step 4: Fluff and AdjustOnce you’ve covered the entire wreath, step back and check for any uneven areas. If needed, trim the coffee filters with scissors to even out the shape. You can also add extra filters to areas that need more fullness.
- Step 5: Customize Your Wreath (optional)Want to add a personal touch? Here are some ideas to customize your DIY coffee filter wreath:Add a ribbon: Tie a decorative ribbon around the top to hang your wreath.Dye the coffee filters: Use tea, Kool-Aid, or food coloring to create a farmhouse-style wreath in muted tones or a bright seasonal wreath for fall or Christmas.Incorporate accents: Hot glue small flowers, beads, or seasonal decorations for an added pop of charm.
More Easy Wreath Tutorials


Stephanie—home cook, DIY addict, seasonal decor fanatic, and proud chicken wrangler living in a Victorian house that’s always a project. Whether I’m cooking with garden-fresh ingredients, herding mischievous chickens, or tackling another DIY, I’m here to share the fun (and chaos).


I love everything about this article!