How To Paint A Dresser with Chalk Paint
Learn how to paint a dresser with chalk paint using this easy guide. No extensive prep work or special skills required. Just dive right in and give your furniture a new look.
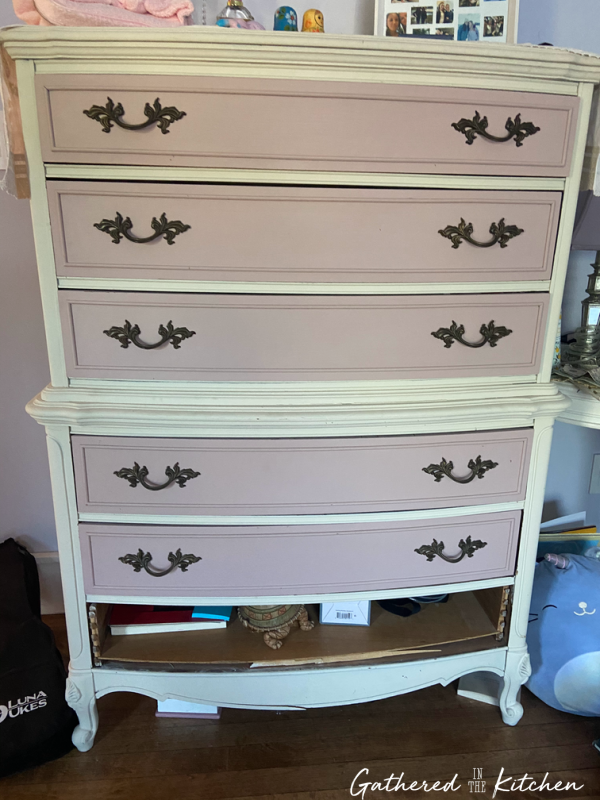
Many years ago, in 2018, I bought an old vintage dresser off of Craigslist from a young guy who clearly had no interest in keeping a very girly looking dresser!
My mom had been visiting us in North Carolina from Illinois so one night, while my hubby was out of town (hahahahaha – yes, yes, yes, that’s when I do my best shopping and DIY projects, haha!) we loaded up my three little kiddos on a rainy night and headed into the city of Charlotte to go pick up a dresser for $25.
We got to the house and to my surprise there was no bottom drawer face. Ugh. I had just driven for 35 minutes in the pouring rain, late at night, with three little kids who would have rather been at home, I wasn’t going to come home empty handed! Call it stubbornness.
This post may contain affiliate links, which means I’ll receive a commission if you purchase through my link, at no extra cost to you. Please read full disclosure here.
I figured I could put baskets on the bottom drawer and fix the problem (spoiler alert: I never did! The bottom sat empty for the entire time I owned the dresser, lol!)
Disclaimer: I also did not need this dresser! I just thought it had such a pretty shape and I wanted to paint it for fun! Anyone else ever been in this boat before?

Supplies Used
- Dixie Belle White Lightning cleaner
- Wash rag
- Bowl
- Dixie Belle Chalk Mineral paint in ‘Tea Rose’
- Dixie Belle Chalk Mineral paint in ‘Drop Cloth’
- Paint brush, I love the mini angle brush
- Painters tape
- Mister spray bottle
How To Paint A Dresser with Chalk Paint
STEP 1: Wash your dresser
Cleaning your dresser is first and foremost. Even if you think your dresser is clean, you need to give it a scrub before painting. I scrubbed the wood as clean as I could get it using my most favorite wood cleaner, White Lightning. I’ve written about this in great detail before, so you can check out this post How To Clean Wood Before Painting to learn more about how to properly clean wood.

STEP 2: Paint!
The most fun part! Once the wood dresser had dried from being cleaned, it was time to paint! I wanted to paint my dresser two different colors; one color for the main body of the dresser and one color for the drawers. I went with Dixie Belle Chalk Mineral paint in the colors of ‘Drop Cloth’ and ‘Tea Rose’. (be sure to see my FAQ section below)

Dresser Body
To paint the sides and top of the dresser, I first removed the drawers. I set them aside in a safe spot until the dresser body was dry.
I used the wet-paint method. You can learn more about this in my Paint Furniture Like A Pro eBook! To sum it up, I misted the wood with water and then applied the chalk paint using my mini angled paint brush.
Dresser Drawers
Before painting the drawer faces, the hardware needs to be removed. Set this aside in a safe place where the screws or bolts won’t roll away 😉
To paint the drawer faces, I put the drawers back into the main body of the dresser and slightly pulled them out. I used painter’s tape to tape off the edges (I cannot stand the look of a messy paint job – when the drawer sides are accidentally painted).
Once I had the tape in place, I used the same wet-paint method to paint the drawer faces in the color of Tea Rose.
When the paint was fully dry, I re-installed the hardware.

While I never got around to actually styling the dresser the way I would have liked, I love the way it turned out. The soft pink was the perfect shade for a little girl.
FAQs
What paint did you use?
I used Dixie Belle Chalk Mineral paint in the color ‘Drop Cloth’ and ‘Tea Rose’. Per the Dixie Belle website “Skip the hassle of sanding, priming, and prepping! Effortlessly apply our paint to wood, walls, glass, ceramics, metal, fabric, and even tricky surfaces like Styrofoam or cardboard!”
Did you seal your dresser?
Nope! I did not seal the dresser with any kind of sealer or topcoat. Per the Dixie Belle website “No topcoat is necessary, but for a personalized touch, explore our range of waxes, glazes, and clear coats.”
How has the dresser held up?
The dresser and paint held up fantastic! I painted this dresser at our home in North Carolina. When we moved half-way across the country to Wisconsin, the dresser was packed and shipped via a moving company. Three months after being settled into our new home, our house was struck by lightning and caught fire. The dresser was then once again removed and survived! The paint held up great and I had no issues with it chipping or peeling.
The only issue I did have was the paint was dirty – dirty from so many times of moving it and unforeseen things happening (like a house fire!) I simply corrected this by applying a new paint of coat over the older paint and it looked good as new!
Where can I get more creative ideas for painting?
Check out my DIY & Craft Inspiration and Support Facebook Community Group!
How can I learn all about painting with chalk and Silk paint?
I have written an in-depth 49 page eBook guide that covers everything you need to know from beginning to end. You can purchase your own copy by clicking on the image below or clicking this link: Paint Furniture Like A Pro.


Stephanie—home cook, DIY addict, seasonal decor fanatic, and proud chicken wrangler living in a Victorian house that’s always a project. Whether I’m cooking with garden-fresh ingredients, herding mischievous chickens, or tackling another DIY, I’m here to share the fun (and chaos).


