Rolled Paper Flower Wreath
Create this bright and cheery rolled paper flower wreath from a package of construction paper and a pizza box lid!
Learn how to make a stunning paper flower wreath with this DIY tutorial! From rainbow-colored rolled paper flowers, this step-by-step guide will show you how to create a wreath that’s perfect for any occasion.
I’d love for you to PIN this wreath tutorial!
Looking to decorate your home for St. Patrick’s day? Get into the spirit of St. Patrick’s Day with some of my favorite holiday treats and decor!
This post may contain affiliate links, which means I’ll receive a commission if you purchase through my link, at no extra cost to you. Please read full disclosure here.

I recently made a book page wreath out of an old copy of The Notebook. Did you see it? I absolutely love the way it turned out! It was such a unique wreath that has such a whimsical feeling to it!
I received a comment saying the wreath would look really pretty as a rainbow! That totally got my wheels spinning and I knew I had to make a different version. A version that used colorful paper in the sequence of a rainbow, especially since St. Patrick’s Day is coming up!

This post contains affiliate links. See my disclosure here.
Supplies
I had all of these supplies on hand so I didn’t have to go buy anything! There are definitely perks at times to being a craft supply hoarder! I turned a pack of construction paper and the lid of a pizza box into this bright and cheery colorful wreath!
- Construction paper
- Hot glue gun
- Cardboard (pizza box)
- Scissors
- Pipe cleaner
Let’s Make It Together!
Step 1: Trace a large circle on a cardboard pizza box. I used the lid of a cookie tin that I repurposed HERE! (My dimensions are 10″ wide…see photo at end of tutorial)

Step 2: Cut out the circle. This is your wreath form

Step 3: Gather several pieces of paper and arrange in color order.

Step 4: Cut each piece in half and then again – so each piece of paper turns into 4 pieces.

Step 5: Roll one corner up like so

Step 6: Continue rolling. Place a dab of hot glue in the bottom corner and adhere to the roll. Continue until you’ve made enough rolls to go around the outer edge. The goal is to make the rolls cone shaped with a point on the one end.

Step 7: Place a small amount of hot glue on the bottom of the roll. Adhere to the cardboard wreath form.

Step 8: Place rolls like so creating a circle. The bottom “edge” of each roll should line up like pictured with the yellow circle

Step 9: Continue on to the next row, blue rolls. Fold up the bottom edge of the cone and apply glue to the folded up area. You fold up the bottom to give the paper rolls more dimension.

Step 10: Place each row slightly lower than the last like so
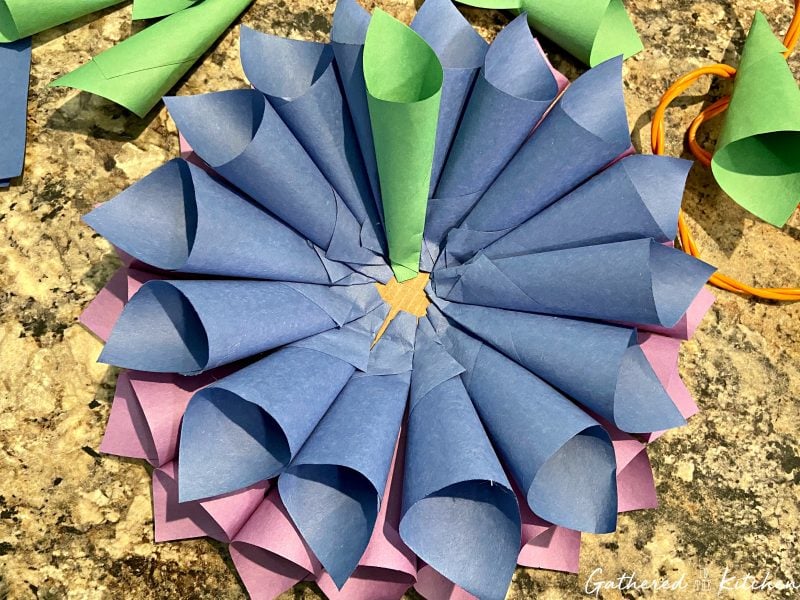
Step 11: By the 4th row, the space to glue the rolls becomes quite small. So you won’t be able to fold up the bottom of the rolls anymore. Put hot glue around the whole bottom tip of the roll and stick in on top of the other rows.

Step 12: The center will be just 1 roll

Step 13: Attach a pipe cleaner to the back for a hook

Overall Dimensions: Due to everyone rolling their paper rolls a little bit differently, it’s hard to say exactly how many rolls to make for each color. Some are tighter, some are looser. Below are the overall dimensions of my wreath

The end!
Display Your Hard Work!
What do you think? Do you like the way it turned out? I love it!


This wreath is not only super cheerful and colorful! It’s great for decorating your home around St. Patrick’s Day. It’s sure to put a smile on anyone’s face!


More Great Wreath Tutorials!
Looking for more wreath inspiration? Check out my other wreath tutorials!
- Burlap Bubble Wreath
- Rag Wreath
- Tulip Wreath
- Coffee Filter Wreath
- Chevron Burlap Wreath
- Plastic Easter Egg Wreath
- Faux Boxwood Wreath
- Back To School Wreath


Stephanie—home cook, DIY addict, seasonal decor fanatic, and proud chicken wrangler living in a Victorian house that’s always a project. Whether I’m cooking with garden-fresh ingredients, herding mischievous chickens, or tackling another DIY, I’m here to share the fun (and chaos).


Good where do we get hot glue gun what other alternative of glue can I use
Hi Eunice, I would really suggest a hot glue gun, as the glue dries very fast. Otherwise, it will be very difficult work quickly with this wreath.