How to Transform a Metal Wall Plaque with Rub ‘n Buff – Easy DIY Makeover
Learn how to give a metal wall plaque a stunning, antique-style makeover using Rub ‘n Buff. Follow this easy DIY tutorial for a beautiful, elegant home décor piece.
My mom found a beautiful metal wall plaque with the perfect ornate design, but it didn’t quite match her bedroom décor. Instead of letting it sit unused, we decided to give it a complete makeover!

We started by painting it with chalk paint to create a soft, matte base, then added Rub ‘n Buff to highlight the intricate details with elegant gold accents. The transformation was stunning—what started as a mismatched piece turned into a gorgeous antique-style statement that now looks like it was made for her space.
In this tutorial, I’ll walk you through the exact steps we took so you can upcycle and customize your own décor with ease!
This post may contain affiliate links, which means I’ll receive a commission if you purchase through my link, at no extra cost to you. Please read full disclosure here.
👉 New to Rub ‘n Buff? Wondering what it is, how to use it, and which colors will work best for your project? Check out my complete guide: What is Rub ‘n Buff? How to Use & Color Options. It’s the perfect starting point before diving into this DIY makeover!

Materials Needed | DIY Metal Wall Plaque Makeover
- Metal wall plaque (or similar decor item)
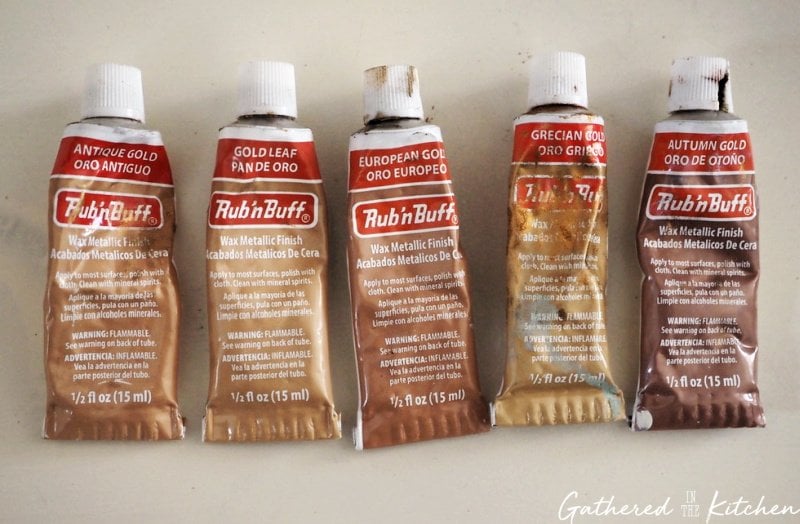
- Rub ‘n Buff – I used a combination of gold shades to achieve the perfect antique finish. If you’re unsure which gold to choose, check out my detailed guide on Rub ‘n Buff Gold Colors to see side-by-side comparisons!
- Chalk paint or base coat (if applicable)
- Soft cloth or brush for application
- Sealer (optional)
How to Use Rub ‘n Buff on a Metal Wall Plaque
Step 1: Prepping the Plaque
- Clean the surface to remove any dust or residue.
- If the plaque has a glossy finish, lightly sand it for better adhesion.
- Apply a base coat of chalk paint (if changing the plaque’s base color).
Step 2: Applying Rub ‘n Buff
- Use a soft cloth, brush, or even your fingertip to apply Rub ‘n Buff. We had really great success using these sponge stick applicators!
- Highlight raised details and edges to enhance the design.
- Blend for a smooth, natural look or build up for a more dramatic metallic effect.
- 💡 Pro Tip: Not sure which Rub ‘n Buff color will give you the exact look you want? See my Rub ‘n Buff Colors Guide for real-life examples of each shade in action!
Step 3: Buffing for Shine
- After a few minutes, gently buff the applied areas with a soft cloth to bring out the luster.
- Add more layers if needed for extra depth.
Step 4: Sealing the Finish (Optional)
- If the plaque will be handled often, apply a glossy clear coat or clear wax spray or spray sealant for added protection.
- Let it dry for 30-45 minutes before handling, and then let cure fo 24 hours.
👉 It’s not just for wall plaques! I also used it to create a stunning gold finish on a thrifted lamp. See the full tutorial here: DIY Rubbed Gold Thrift Store Lamp Makeover.

Tips for Best Results
- Lightly sand the surface prior to applying Rub ‘n Buff
- Start with a light hand and build up the color gradually.
- Use different Rub ‘n Buff shades to add dimension.
- Test on a small section before applying it to the entire piece.
- 👉 Want to achieve an even more luxurious, gilded look? If you love the metallic effect of Rub ‘n Buff but want a true gold leaf finish, check out my step-by-step guide on How to Create a High-End Look with Gold Leaf. It’s another easy way to elevate your home décor with gold accents!

FAQs About Using Rub ‘n Buff
Yes! It adheres well to non-porous surfaces.
About 30-45 minutes, but allow 24 hours to fully cure.
Absolutely! Layer different shades for depth.

Now you know how to give any metal wall plaque an antique-style makeover using Rub ‘n Buff! Try this DIY technique to transform home décor with a budget-friendly, elegant touch.

DIY Metal Wall Plaque with Rub ‘n Buff
Materials
- Metal wall plaque (or similar decor item)
- Rub 'n Buff
- Chalk paint or base coat (if applicable)
- Soft cloth or brush for application
- sponge stick applicator
- Spray Sealer (optional)
Instructions
- Step 1: Prepping the Plaque. Clean the surface to remove any dust or residue. If the plaque has a glossy finish, lightly sand it for better adhesion. Apply a base coat of chalk paint (if changing the plaque’s base color).
- Step 2: Applying Rub ‘n Buff. Use a soft cloth, brush, or even your fingertip to apply Rub ‘n Buff. Highlight raised details and edges to enhance the design. Blend for a smooth, natural look or build up for a more dramatic metallic effect.💡 Pro Tip: Not sure which Rub ‘n Buff color will give you the exact look you want? See my Rub ‘n Buff Colors Guide for real-life examples of each shade in action!
- Step 3: Buffing for Shine. After a few minutes, gently buff the applied areas with a soft cloth to bring out the luster. Add more layers if needed for extra depth.
- .Step 4: Sealing the Finish (Optional). If the plaque will be handled often, apply a glossy clear coat or clear wax spray or spray sealant for added protection. Let it dry for 30-45 minutes before handling, and then let cure fo 24 hours.
Notes
- Start with a light hand and build up the color gradually.
- Use different Rub ‘n Buff shades to add dimension.
- Test on a small section before applying it to the entire piece.
- 👉 Want to achieve an even more luxurious, gilded look? If you love the metallic effect of Rub ‘n Buff but want a true gold leaf finish, check out my step-by-step guide on How to Create a High-End Look with Gold Leaf. It’s another easy way to elevate your home décor with gold accents!


Stephanie—home cook, DIY addict, seasonal decor fanatic, and proud chicken wrangler living in a Victorian house that’s always a project. Whether I’m cooking with garden-fresh ingredients, herding mischievous chickens, or tackling another DIY, I’m here to share the fun (and chaos).