Personalized Hanging Bow Holder
Looking for a unique and practical gift for a baby or toddler? This DIY personalized hanging bow holder is the perfect way to organize hair bows while adding a decorative touch to a nursery or bedroom. Instead of gifting traditional toys and clothes, I created this custom bow holder for a special little girl’s first birthday.
This weekend we helped celebrate our next door neighbor’s 1st birthday! Rather than gift her with the typical toys and clothes I decided to put my “creative hat” on and came up with this personalized hanging bow holder!

How to Make a Personalized Hair Bow Holder
This project starts with a simple wooden board, transformed with paint, embellishments, and ribbons to create a stylish and functional hair accessory organizer. Follow the steps below to create your own!
Materials Needed:
- Wooden board (any size you prefer)
- Acrylic paint in desired colors
- Paintbrushes or foam brushes
- Wooden letters or stencils for personalization
- Ribbon (various colors and widths)
- Hot glue gun and glue sticks
- Sandpaper (optional, for smoothing edges)
- Hanging hardware (sawtooth hanger or ribbon loop)
Step-by-Step Instructions
Step 1: Prepare the Wooden Board
Start with a plain wooden board. Sand the edges for a smooth finish if needed. Lightly mark where the name and ribbons will be placed with a pencil.
This post may contain affiliate links, which means I’ll receive a commission if you purchase through my link, at no extra cost to you. Please read full disclosure here.

Step 2: Paint the Board
Choose a color scheme that matches the child’s room. Apply an even coat of acrylic paint and let it dry completely. You may need multiple layers for full coverage.
Step 3: Add Personalization
Use wood lettering, stencils, or freehand painting to add the child’s name or initials. Let it dry before handling.

Step 4: Attach the Ribbons
Cut ribbons into equal lengths and space them evenly across the bottom of the board. Secure them with hot glue so they hang downward for clipping bows.
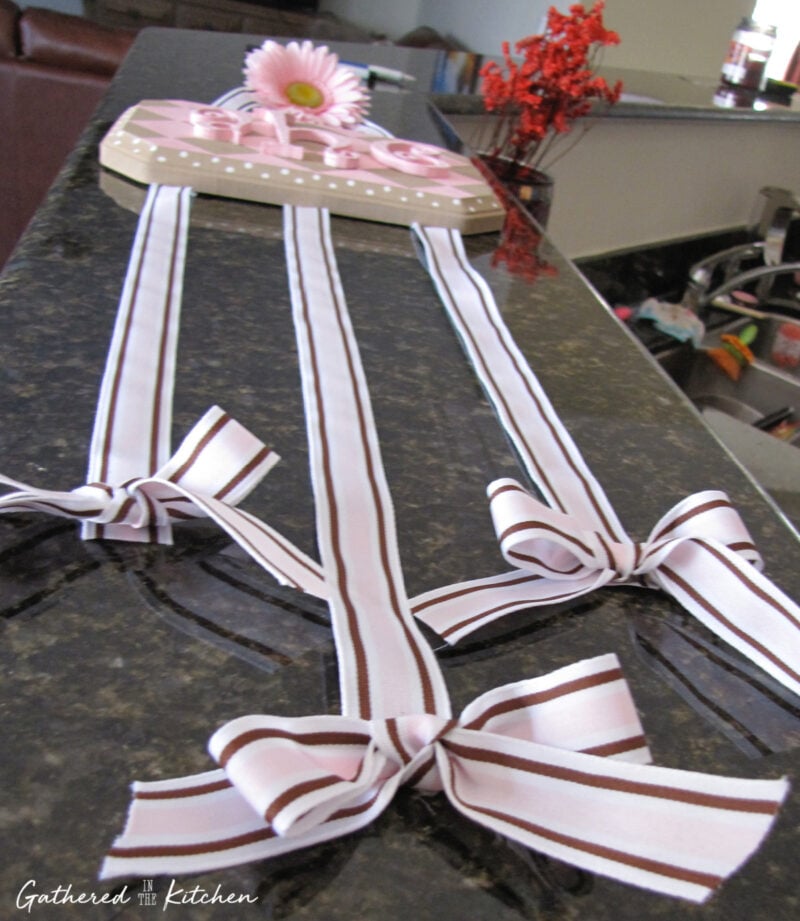
Step 5: Add Hanging Hardware
Attach a sawtooth hanger to the back or loop a ribbon at the top for easy hanging.

Step 6: Fill with Hair Bows
Clip bows onto the ribbons for an organized and stylish display. If gifting, include a few handmade bows for an extra special touch! 👉 How to Make A Curly Korker Hair Bow tutorial!


I was really happy with the way it turned out! I was told that I should start selling these…so who wants one?!?! 😉

Personalized Hanging Bow Holder
Equipment
- Paint brushes or foam brushes
Materials
- Wooden board (any size you prefer)
- Acrylic paint in desired colors (in desired colors)
- Wooden letters or stencils (for personalization)
- Ribbon (various colors and widths)
- Hot glue gun and glue sticks
- Sandpaper (optional, for smoothing edges)
- Hanging hardware (sawtooth hanger or ribbon loop)
Instructions
- Step 1: Prepare the Wooden Board – Start with a plain wooden board. Sand the edges for a smooth finish if needed. Lightly mark where the name and ribbons will be placed with a pencil.
- Step 2: Paint the Board – Choose a color scheme that matches the child’s room. Apply an even coat of acrylic paint and let it dry completely. You may need multiple layers for full coverage.
- Step 3: Add Personalization – Use wood lettering, stencils, or freehand painting to add the child’s name or initials. Let it dry before handling.
- Step 4: Attach the Ribbons – Cut ribbons into equal lengths and space them evenly across the bottom of the board. Secure them with hot glue so they hang downward for clipping bows.
- Step 5: Add Hanging Hardware – Attach a sawtooth hanger to the back or loop a ribbon at the top for easy hanging.
- Step 6: Fill with Hair Bows – Clip bows onto the ribbons for an organized and stylish display. If gifting, include a few handmade bows for an extra special touch!


Stephanie—home cook, DIY addict, seasonal decor fanatic, and proud chicken wrangler living in a Victorian house that’s always a project. Whether I’m cooking with garden-fresh ingredients, herding mischievous chickens, or tackling another DIY, I’m here to share the fun (and chaos).


This is so cute. I love the font of the letters. Nice Job, You have a little artist there.
Love the harlequin-esque pattern on the background. Very pretty! Lots of nice storage…we have our fair share of bows!
Thanks so much for joining my Weekend Bloggy Reading party. 🙂 Have fun finding some new reads, and I hope you’ll stop by to visit Serenity Now again soon. 🙂
ADORABLE! I absolutely LOVE it! Now I want to go make my own. And, YES, you should definitely sell these :O).
Thanks! 🙂 I had a lot of fun making it…now I need to make one for my own daughter! 🙂
This paragraph is genuinely a nice one it helps new web visitors, who
are wishing in favor of blogging.