How To Turn A Dresser Into A Dining Room Hutch
Turn an old wooden dresser into a dining room hutch by attaching tall table legs, chalk paint makeover and changing the drawer hardware.
This is the tale of a dresser that waited and waited to become the beautiful piece of furniture she was meant to be…
Years ago my husband and I had bought a really large solid wood dresser at Goodwill that we figured we would makeover. We paid $35 for it, brought it home, and it sat in our garage. Then we moved out of state and it got packed up in the moving truck and was relocated to our new home. We used the dresser as a TV stand but never made it over. We then moved out of state again and the dresser sat collecting dust for several years. Until one day I had the genius idea of moving it into my current dining room and adding tall legs to it. However, I still never re-did it, and it just sat there for over a year looking like it needed love. It was just one of those projects that I wasn’t sure exactly what I wanted to do nor was sure I could figure out the right color for it.
I have to admit, my hubby and I are 1. super (beyond ridiculous) about finding the exact perfect paint color…to the point that you just say “screw it, leave it the way it is!” 2. I’m really not the biggest fan of painted wood…if the piece is in good shape and not needing paint to hide the imperfections. Which this dresser was actually in fantastic shape! So, it just took forever to finally bite the bullet and just do something with it!..and now that it’s over, I’m so happy I did! (even besides the fact that I loved the color of the original stain, it just didn’t match my dining room)
This post may contain affiliate links, which means I’ll receive a commission if you purchase through my link, at no extra cost to you. Please read full disclosure here.
Check out 10 Ways to Make Over Furniture with Chalk Paint
Here she is before…
I had already added the 9″ legs which I had bought from Lowes.

I had just finally had enough of her looking ugly so I picked up a jar of Dixie Belle chalk paint at my local antique store. It was the only jar they had in the color I wanted, driftwood. This paint is actually hard to find, so it’s best to purchase it from Amazon. This is the same paint that I had used to paint my gorgeous stencil topped table!
Check out: Before & After Projects Using Dixie Belle Chalk Paint
Products I Used
- Wooden Furniture Legs 9″
- Dixie Belle Driftwood chalk paint (main dresser)
- Dixie Belle Dropcloth chalk paint (dresser legs)
- Dixie Belle White Lightning Cleaner
- A Rounded Tip Paint Brush

Prep Work Before Painting Furniture
I cleaned my piece first with the white lightning cleaner by:
- dissolving of two heaping tablespoons of cleaner in hot water.
- I then soaked a rag and rang it out and then wiped it all over my dresser, repeating the process several times.
- Once the dresser was good and clean (your water will turn really dark, it’s amazing), you then need to wipe down your entire piece with a clean wet rag to remove any excess white lightning cleaner. *If you anciently leave some of the cleaner on your wood, the paint will not stick.
- Remove all hardware and make sure to clean with white lightning where the hardware was
How to Paint with Chalk Paint
Once the dresser was completely cleaned and dry, it was time for the fun part!
- I grabbed an empty plastic container that I filled with about 3/4″ of water.
- I used my favorite brush and dipped it in the water, just getting the tips wet.
- I then dipped the slightly wet bristles into the jar of paint and got to work. Chalk paint works best when applied with a wet brush. This is called the wet method. Before I knew this, and painted dry, the paint did not go very far and it was very thick and a bit difficult to spread out.

I refinished the dresser hardware using Rub ‘n Buff for a fresh, updated look. Check out my step-by-step tutorial here: How to Apply Rub ‘n Buff to Dresser Hardware and Handles.

To decorate my newly refinished dresser-turned-hutch, I added a thrift store lamp that I bought and gave it a stunning antique gold makeover. Check out my tutorial here: DIY Rubbed Gold Thrift Store Lamp Makeover!


Other Decor In The Room
- Candlesticks: before and after tutorial
- Lamp: before and after tutorial
- Tray: I bought at a thrift store and painted in Dixie Belle Drop Cloth

- Large Together Sign: I made, sorry no tutorial
- Bruce Party of 5 Sign: another one I made with no tutorial but you can purchase them from me by commenting or messaging me on Facebook
- Pitcher Vase & Lavender Flowers: from Michaels
- Rug: Lowes
I would love for you to share this dresser makeover before & after on Pinterest!

You Will Also Love…
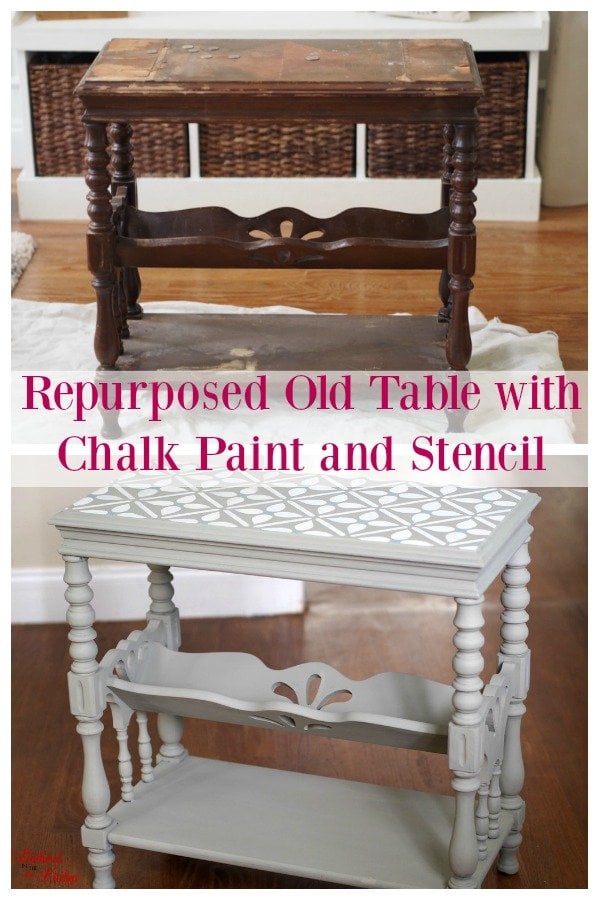
Repurposed Old Table with Chalk Paint and Stencil

Laundry Room Makeover Under $50


Stephanie—home cook, DIY addict, seasonal decor fanatic, and proud chicken wrangler living in a Victorian house that’s always a project. Whether I’m cooking with garden-fresh ingredients, herding mischievous chickens, or tackling another DIY, I’m here to share the fun (and chaos).


Looks fantastic! Thank you for the information.
Would you mind letting me know how your knobs are doing now? And how long has it been since the rub and buff was applied to the knobs?
Thank you so much!!!
Hi Elisha! I actually sold this dresser about a year ago…but…the knobs had held up just fine and there was no distressing to the Rub ‘n Buff. However, to be very honest, I did not use the knobs that often as it was in my dining room … and I didn’t really need to open those drawers that often. Sorry I can’t be of more help!